
Peach Bitcoin Under the Hood: a technical look at why it’s the safest P2P exchange
Aaaaah Bitcoin, this wonderful form of money that thrives on its core features. We all love it, but we all recognize that there are risks with the self-sovereignty part: you share your seeds and you lose it all. You send some to the wrong address and you are never getting it back.
This is why open sourcing Bitcoin related software is very important, and Peach’s App is available on Github for everyone to review!
Of course, being open source does not mean you will have everyone carefully reading out the code and reverse-engineering the mechanism. That is why I am writing this article: to show how secure Peach is and what are the steps done to achieve it.
Step 1: creating a No-KYC account on Peach
To be very clear: your Bitcoin Seed is your Peach Account.
If you want to use Peach, you need to create an account, and that consists of sharing the Public Key of your account and proving that you own it.
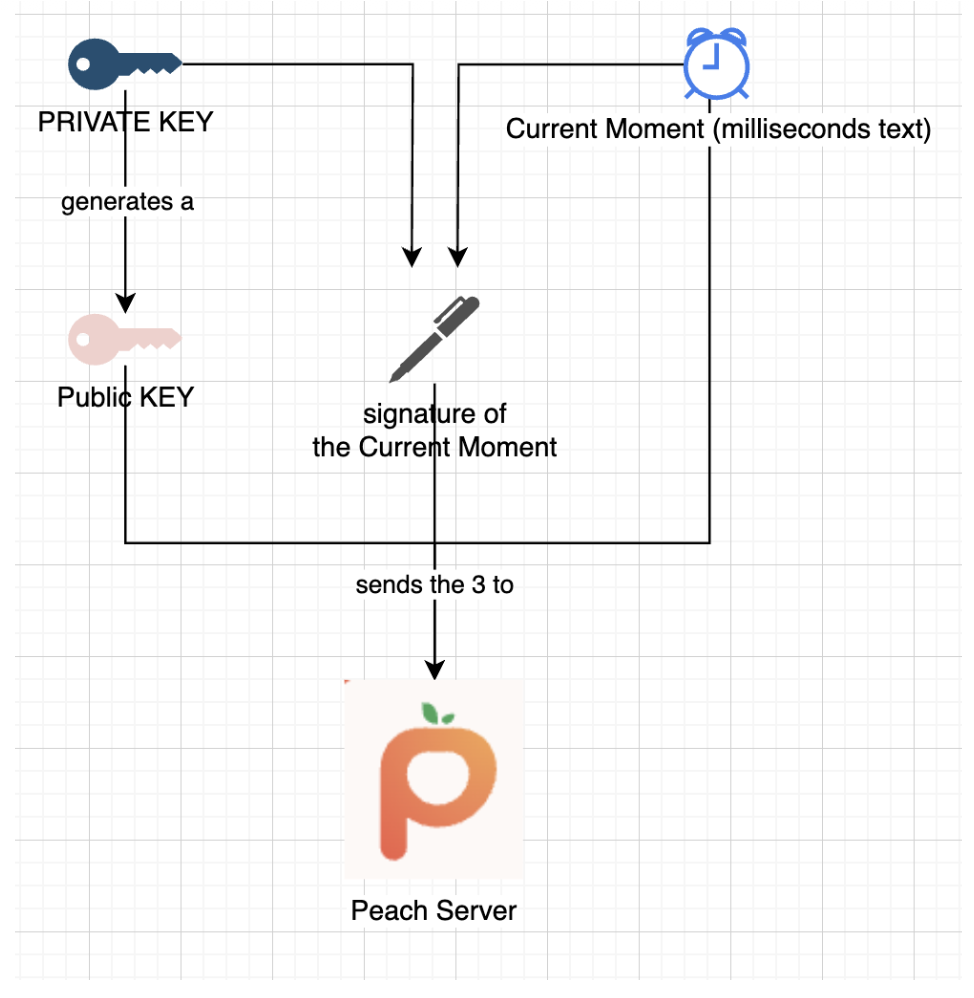
To do so, you need to:
-
1 - get the current Date and Time (in milliseconds) as text
-
2 - use your Private Key to generate a signature of the previous text
-
3 - submit the Public Key, the current Datetime and the signature.
You also need to generate a uniqueId which will be used to avoid other users to pretend to be you. This is useful in cases such as losing the seeds and keeping the same account. But let’s not focus too much on this.
Here is the code to perform this in Javascript:
  const seed = randomBytes(64);

  const root = bip32.fromSeed(seed, bitcoin);
  const child = root.derivePath("m/0");
  const keyPair = ECPair.fromPrivateKey(child.privateKey, { network: bitcoin });

  const publicKeyHex = Buffer.from(keyPair.publicKey).toString("hex");

  const session = axios.create({
    baseURL: "https://api.peachbitcoin.com/",
    httpAgent: new http.Agent({ keepAlive: false }),
    httpsAgent: new https.Agent({ keepAlive: false }),
  });

  const registerMessage = String(Date.now());
  const registerMessageSignature = signWithBtcPrivKey(registerMessage, keyPair);

  const resp = await session.post("v1/user/register", {
    publicKey: publicKeyHex,
    message: registerMessage,
    signature: registerMessageSignature,
    uniqueId: "my_own_unique_id_random_12345",
  });

  const accessToken = resp.data.accessToken;

  session.defaults.headers.common["authorization"] = accessToken;
Congratulations! You have just created an account on Peach! The Server has validated that you, at this current moment, are the owner of the Bitcoin Key-Pair correspondent to the submitted Public Key.
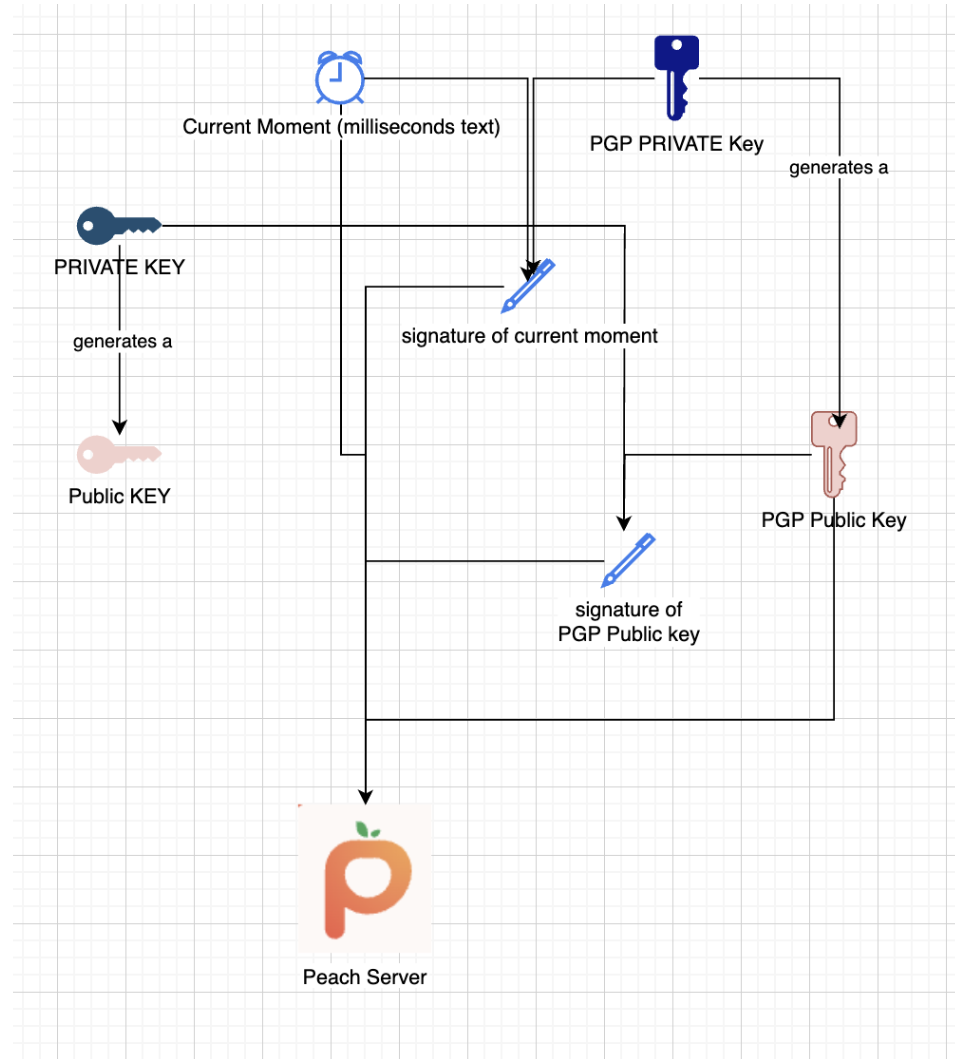
Step 2: submitting your Public PGP Key
There will be a lot of encryption, but also some decryption. The Bitcoin Keys only allow one-way encryption, so we will need PGP Keys to perform 2-way encryption. This is fundamental to encrypt and decrypt bank account data, chat messages, etc. Submitting the Public PGP key is similar to the process of submitting the Public Bitcoin Key. However, there is an extra step of signing the Public PGP Key with the Bitcoin Private Key, to double-check that the user is the owner of both Bitcoin and PGP keys.
const { privateKey: pgpPrivateKey, publicKey: pgpPublicKey } =
    await createPGPKey();

  const pgpPublicKeyMessageSignature = signWithBtcPrivKey(
    pgpPublicKey,
    keyPair
  );
  const setPgpKeysMessage = String(Date.now());

  const setPgpKeysMessageSignature = await signPGPMessage(
    pgpPrivateKey,
    setPgpKeysMessage
  );

  await session.patch("v1/user", {
    pgpPublicKey: pgpPublicKey, // the PGP Pub key
    signature: pgpPublicKeyMessageSignature, // the above signed by the BTC Key
    message: setPgpKeysMessage, // the current timestamp
    pgpSignature: setPgpKeysMessageSignature, // the above signed by the PGP Key
  });
At this moment, Peach has both your Bitcoin and PGP Public Keys! This will be extremely relevant for trading in Peach.
Next Steps
From this point onward, the tutorial will show both sides: the Buyer side and the Seller side.
The steps will be the following:
-
3.S Seller creates a Sell Offer
-
4.S Seller funds the Peach Escrow
-
5.B the Buyer performs a Trade Request to the Sell Offer
-
5.S the Seller accepts the Buyer’s Trade Request
-
6.B the Buyer declares that the Fiat transfer has been made
-
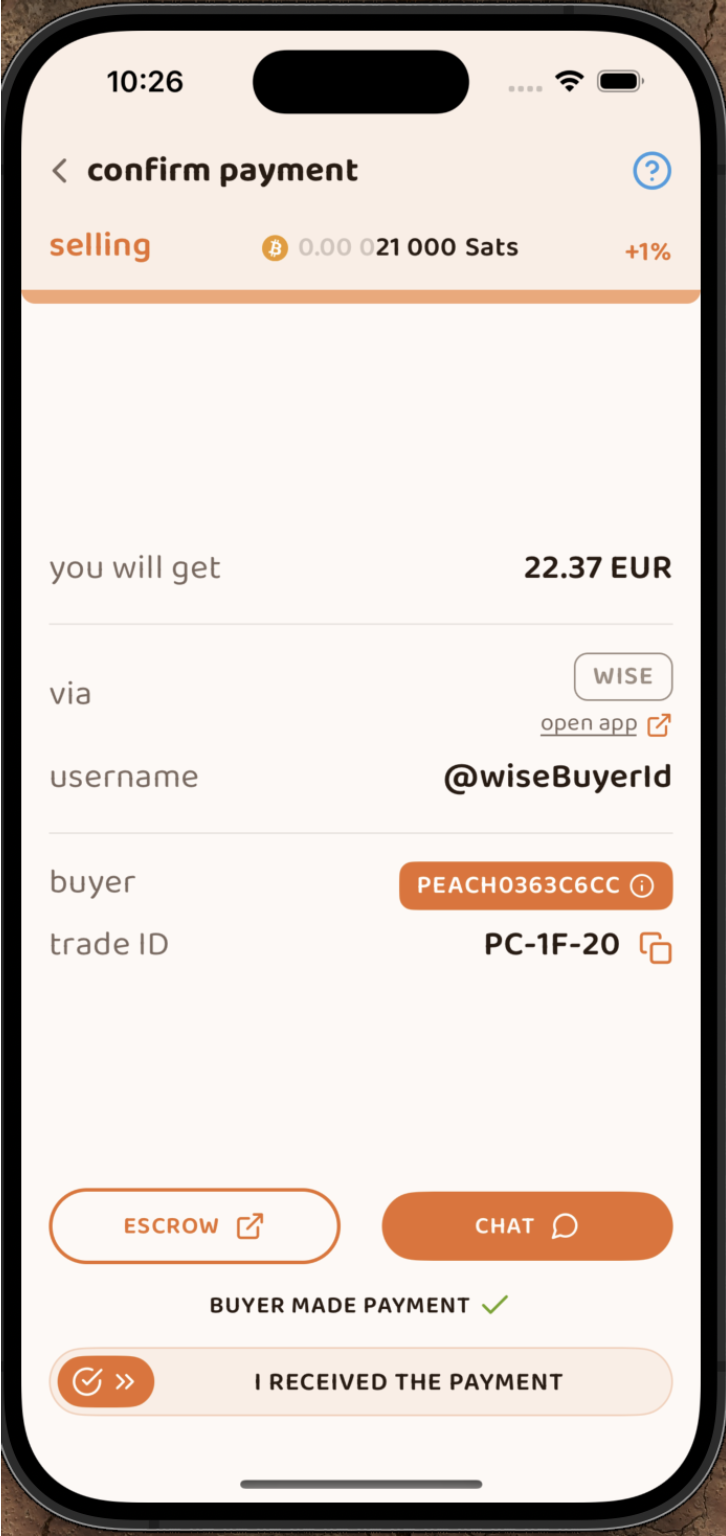
6.S the Seller confirms he received the Payment
Step 3.S: Seller creates a Sell Offer
Creating a Sell Offer is equivalent to announcing that you are willing to sell a specific amount of Bitcoin. But that’s not all: the Seller must accept something in return. To break it down, a Sell Offer is:
-
an amount of Bitcoin to sell
-
the Currencies the Seller is accepting
-
the Payment Methods the Seller is accepting (cash in hand, a Bank Transfer, a Revolut transaction, etc)
-
the Premium ( how expensive the Bitcoin is according to the current market value )
If everything goes well, a Buyer will be interested in the offer and request to trade with it. At that moment, he will have to select one single Currency and Payment Method from the available ones, but the more the Seller displays the higher his chances of attracting a Buyer are.
const sats_to_sell = 21000;
  const sell_premium = 1; // 1%
  const payment_data_currency = "EUR";
  const payment_data_method = "wise";

  const { address: returnAddress } = bitcoin.payments.p2wpkh({
    pubkey: Buffer.from(keyPair.publicKey),
    network: bitcoin,
  });
  const sellOfferPaymentDataToEncrypt = JSON.stringify({
    reference: "",
    userName: "@myWiseIdTradingBot",
  });

  const paymentDataEncryptSHA256 = await sha256(sellOfferPaymentDataToEncrypt);

  const offerCreateRes = await session.post("v1/offer", {
    type: "ask",
    amount: sats_to_sell,
    meansOfPayment: { [payment_data_currency]: [payment_data_method] }, // {"EUR": ["wise"]}
    paymentData: {
      [payment_data_method]: { hashes: [paymentDataEncryptSHA256] },
    },
    returnAddress: returnAddress,
    premium: sell_premium,
  });
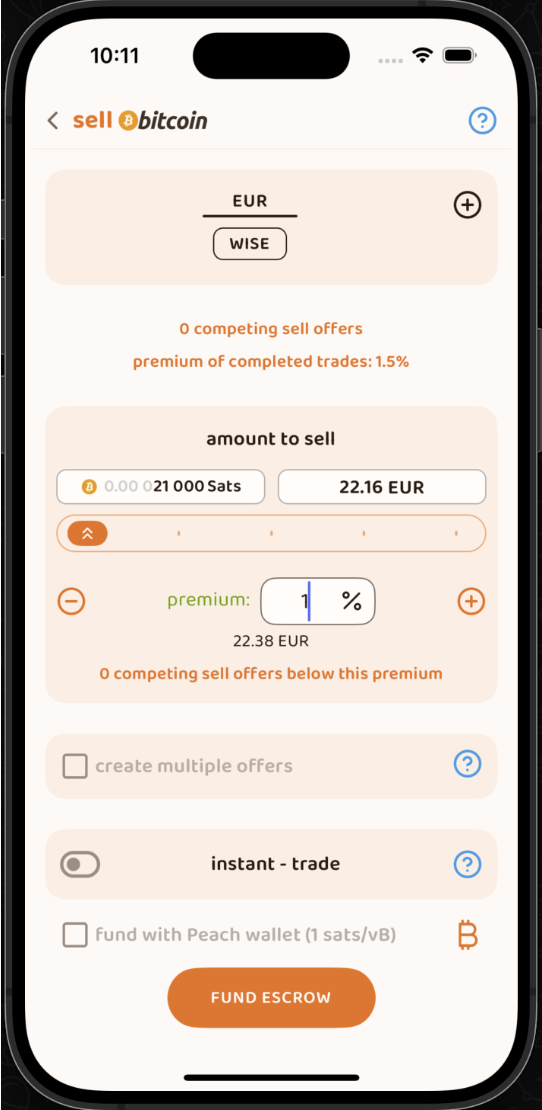
As you can see in the code, the Seller is announcing he is selling 21000 Sats (0.00021 Bitcoin) at a 1% premium. He wants to receive Euros through his Wise account. If you pay close attention, he is NOT submitting his Wise Account ID, he is just submitting a Hash. Peach will never know his Payment Method Details, to keep things anonymous. Also, a Return Address is submitted. This is used in case of a refund: no Buyers want your Bitcoin, so you can get it back.
Step 4.S: Seller funds the Peach Escrow
After a successful request to the Peach API to create the Sell Offer, the Seller gets the Sell Offer ID:
const sellOfferId = offerCreateRes.data.id;
This value is important, keep it. There are other ways to get it, but keep it for now. The Sell Offer was created, but it is not yet public: no Buyers can interact with it. First, the Seller needs to fund the Escrow.
The Escrow is like a Vault that requires both the Seller’s and Peach’s authorization to open. The Bitcoin is inserted in the Vault and it stays there safely until the end of the Trade. Since it requires the Seller’s authorization, and the Escrow is a Script on the Bitcoin Blockchain ( a P2WSH address ), then Peach needs the Seller’s Public Key to create this Escrow.
At this moment, the Seller submits the Public Key he wants to use for the Escrow to Peach, Peach selects its own Public Key for the Vault and constructs it, resulting in an address.
const childSell = root.derivePath(`m/84'/0'/0'/${sellOfferId}'`);

  const keyPairSellOffer = ECPair.fromPrivateKey(childSell.privateKey, {
    network: bitcoin,
  });

  const sellOfferPublicKey = Buffer.from(keyPairSellOffer.publicKey).toString(
    "hex"
  );

  const escrowCreateRes = await session.post(
    "v1/offer/" + sellOfferId + "/escrow",
    {
      publicKey: sellOfferPublicKey,
    }
  );

  const escrowAddress = escrowCreateRes.data.escrows.bitcoin;

  const escrowPeachPublicKey =
    escrowCreateRes.data.escrowPeachPublicKey.bitcoin;
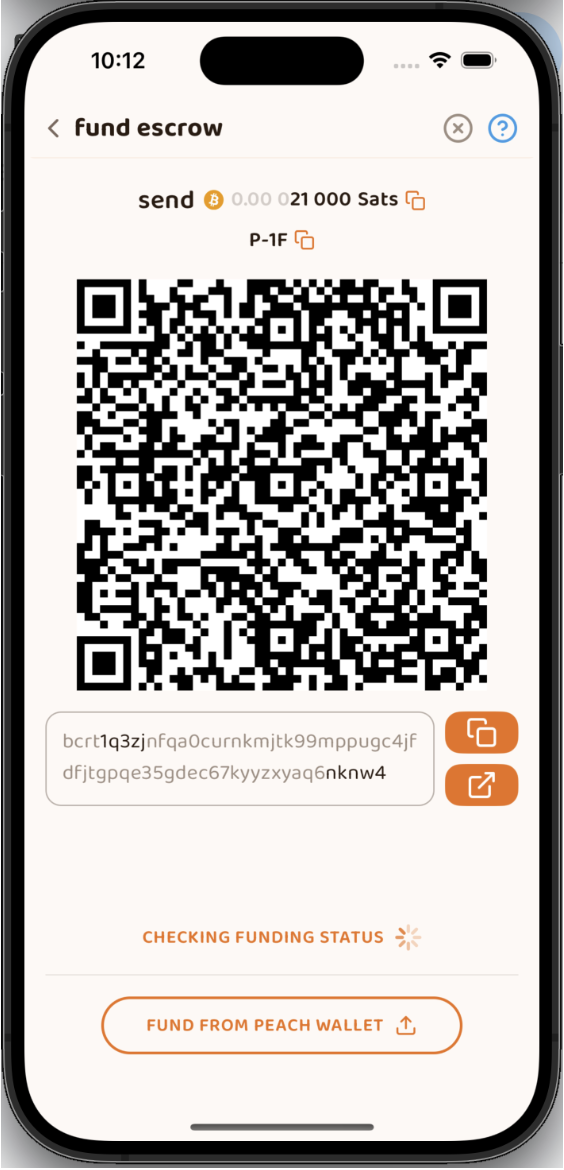
As you can see in the code, the Seller decided to derive a new Key Pair using the Sell Offer ID on the derivation path. This is a safe approach, because it is easily reproducible. After submitting the Public Key, the Peach API returns the address where the Seller should send the 21000 Sats. However, you don’t need to trust that this address is valid: you can verify it.
So let’s verify it!
The Peach API also returns the Public Key that Peach used for this specific Escrow, and this will allow us to recreate the address by writing the Bitcoin Script:
   OP_IF
       ${script.number.encode(4320).toString("hex")}
       OP_CHECKSEQUENCEVERIFY
       OP_DROP
   OP_ELSE
       ${sellerPublicKey}
       OP_CHECKSIGVERIFY
   OP_ENDIF
   ${peachPublicKey}
   OP_CHECKSIG
This is the Script we are using for the Escrow:
-
it always requires Peach’s signature
-
it either:
-
- requires the Seller’s signature
-
- requires that 4320 blocks have been mined since the Bitcoin was sent to that address
Why 4320 blocks? That’s 30 days of blocks mined, at an average of 1 block per 10 minutes. Why do we have that alternative of only requiring Peach’s signature after 1 month? Because Sellers might not be cooperative, they might lose their keys, etc. One thing is true: Peach has a pristine reputation of handling Seller’s funds.
After you build the script, you can verify the P2WSH address it generates, and you can see it is the same that the Peach API sent as a response to creating the Escrow.
  const multisigScript = bitcoin.script.compile([
    Buffer.from(sellOfferPublicKey, "hex"),
    bitcoin.opcodes.OP_CHECKSIGVERIFY,
  ]);

  const timelockScript = bitcoin.script.compile([
    bitcoin.script.number.encode(4320),
    bitcoin.opcodes.OP_CHECKSEQUENCEVERIFY,
    bitcoin.opcodes.OP_DROP,
  ]);

  const redeemScript = bitcoin.script.compile([
    bitcoin.opcodes.OP_IF,
    ...timelockScript,
    bitcoin.opcodes.OP_ELSE,
    ...multisigScript,
    bitcoin.opcodes.OP_ENDIF,
    Buffer.from(escrowPeachPublicKey, "hex"),
    bitcoin.opcodes.OP_CHECKSIG,
  ]);

  const escrowPayment = bitcoin.payments.p2wsh({
    redeem: { output: redeemScript },
    network: bitcoin,
  });

  console.log("Addresses Match:", escrowPayment.address === escrowAddress);
Perfect! Now just perform a Bitcoin transaction to that address and wait until the Escrow is declared as funded.
  while (true) {
    const fundingStatusRes = await session.get(
      "v1/offer/" + sellOfferId + "/escrow"
    );
    if (fundingStatusRes.data.funding.status === "FUNDED") {
      break;
    }
  }
Once it is declared as funded (after 1 block is mined) the Sell Offer becomes public and Buyers can start interacting with it!
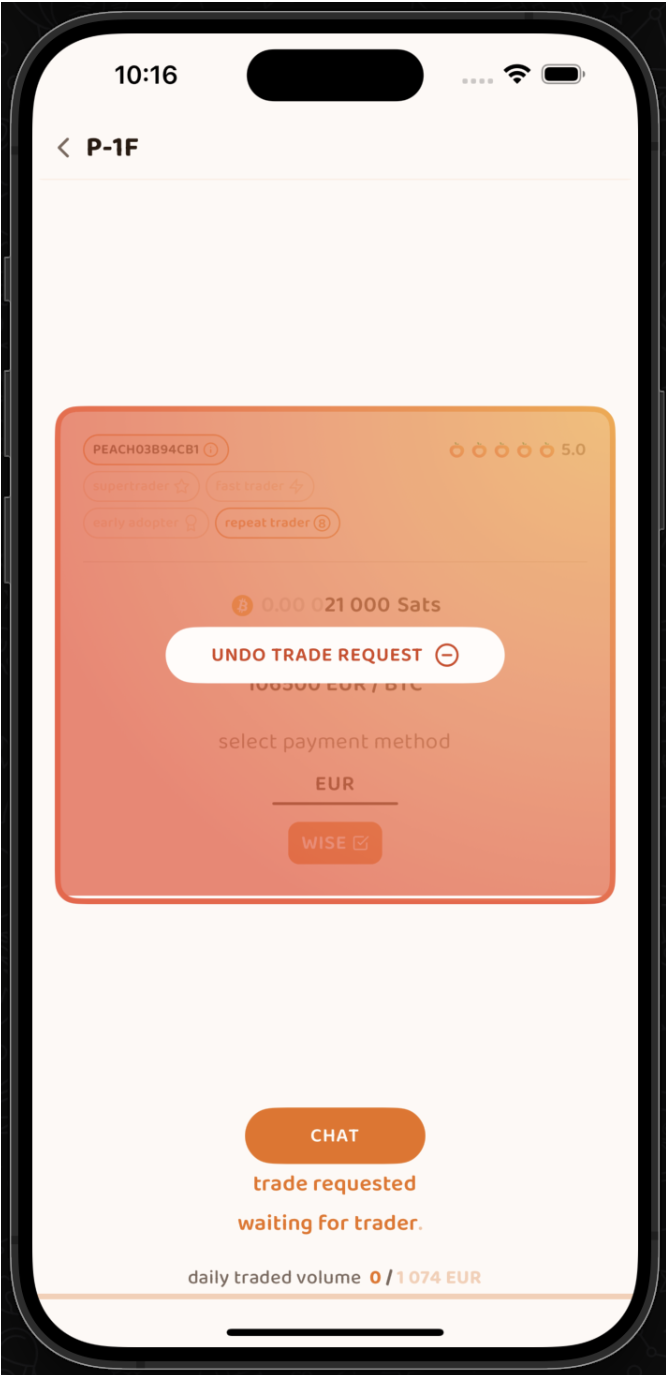
Step 5.B: Buyer performs a Trade Request to the Sell Offer
Now it’s the time for the Buyer to get to action!
First, let’s check all available Sell Offers:
const sellOffers = await session.get("v069/sellOffer");
For the sake of simplicity, the Buyer will be interested in the 1st Sell Offer available.
const sellOfferToTradeRequestId = sellOffers.data.offers[0].id;
Now, the Buyer wants to perform a Trade Request, telling the Seller he is willing to Trade under his conditions. Sounds simple, right? But this is the most complex step of the entire process.
Let’s break down what the Buyer needs to submit:
-
the preferred Payment Method (one of the allowed by the Seller)
-
the preferred Currency (same as above)
-
a Symmetric Key (for the Buyer and Seller to communicate directly) Encrypted
-
the signature of the Symmetric Key
-
the Payment Data Encrypted using the Symmetric Key
-
a signature of the Payment Data
-
the Release Address: where the Buyer wants to receive the purchased Bitcoin
-
the Release Address Message Signature: a proof that the Buyer owns that address, using BIP 322
-
the maximum mining fee: how much the Buyer is willing to give up of his final Bitcoin to pay Miner Fees of the final Transaction.
That's a lot, right? But that’s why Peach is super secure! Let’s go step by step.
The preferred Payment Method and Currency:
This one is the simplest:
  const payment_data_currency = "EUR";
  const payment_data_method = "wise";
The Symmetric Key:
The Symmetric Key is going to be used with AES256 Bidirectional Encryption: you can encrypt a message and then decrypt it using the same key:
async function decryptDataWithSymmetricKey(encryptedMessage, symmetricKey) {
  const message = await openpgp.readMessage({
    armoredMessage: encryptedMessage,
  });

  const { data: decrypted } = await openpgp.decrypt({
    message,
    passwords: [symmetricKey],
    format: "utf8",
  });

  return decrypted;
}

async function encryptDataWithSymmetricKey(data, symmetricKey) {
  const message = await openpgp.createMessage({ text: data });
  const encrypted = await openpgp.encrypt({
    message,
    passwords: [symmetricKey],
    format: "armored",
    config: {
      preferredSymmetricAlgorithm: openpgp.enums.symmetric.aes256,
    },
  });
  return encrypted;
}
To create one, just generate a random number:
  const symmetricKey = randomBytes(32);
  const symmetricKeyHex = symmetricKey.toString("hex");
You are not going to submit this key in plain sight: that would defeat its purpose. You must encrypt it in a way that only the Buyer and the Seller can decrypt it. Since both users have submitted their Public PGP Keys, then we need to encrypt it in a way that only allows the decryption using 1 of the corresponding Private PGP Keys:
async function encryptForMultipleRecipients(secret, publicKeysArmored) {
  const publicKeys = await Promise.all(
    publicKeysArmored.map((armored) => openpgp.readKey({ armoredKey: armored }))
  );
  const message = await openpgp.createMessage({ text: secret });

  const encrypted = await openpgp.encrypt({
    message,
    encryptionKeys: publicKeys,
  });

  return encrypted;
}

  const matchingUserPgpPubKey = sellOffers.data.offers[0].user.pgpPublicKey;

  const symmetricKeyEncrypted = await encryptForMultipleRecipients(
    symmetricKeyHex,
    [pgpPublicKey, matchingUserPgpPubKey]
  );
And for the Seller to be sure that the Symmetric Key was produced by the Buyer, he must also sign it using the PGP key:
  const symmetricKeySignature = await signPGPMessage(
    pgpPrivateKey,
    symmetricKeyHex
  );
The Payment Data:
This is the most valuable piece of information: your Payment Data. It can be your Bank Account IBAN, your Revolut username, everything that can identify the origin of your Fiat payment. The Seller will later share his information with the Buyer.
Now that we have a Symmetric Key, we can use it to Encrypt the Payment Data, and it will be later on used by the Seller to decrypt it.
const paymentDataToEncrypt = JSON.stringify({
    reference: "",
    userName: "@buyerWiseId",
  });

const paymentDataEncrypted = await encryptDataWithSymmetricKey(
paymentDataToEncrypt,
symmetricKeyHex
);

const paymentDataSignature = await signPGPMessage(
pgpPrivateKey,
paymentDataToEncrypt
);
Defining the Release Address and proving ownership:
You must define where you want the Bitcoin of the Trade to be sent to afterwards. Creating an address is the easy part. The tricky part is proving the ownership of the address. We do this for regulation purposes, to ensure the Buyer is the actual owner of it, and luckily it doubles as an extra safety precaution (this alone makes Peach immune to the Address Replacement Attack using Javascript libraries of September 2025).
The proof of ownership is performed using BIP-322, which allows you to use your Bitcoin Private Key to sign a message that can be validated using the Address.
  const { address } = bitcoin.payments.p2wpkh({
    pubkey: Buffer.from(keyPair.publicKey),
    network: bitcoin,
  });

  const ownershipMessage =
    "I confirm that only I, peach" +
    publicKeyHex.slice(0, 8) +
    ", control the address " +
    address;

  const releaseAddressSignature = signWithBIP322(
    wif,
    address,
    ownershipMessage
  );
One last detail: the maximum mining fee:
As a Buyer, you might not wish to spend that much on fees to get your Bitcoin, and you would rather wait for the fees to drop before getting the funds. In this case, you can define the Maximum Mining Fee you are willing to “pay” to get the Bitcoin sent to you.
Finally, you make the Trade Request to the Sell Offer
What a ride, hun? But here it is, and you can submit it.
  await session.post(
    "v069/sellOffer/" + sellOfferToTradeRequestId + "/tradeRequestPerformed",
    {
      paymentMethod: payment_data_method,
      currency: payment_data_currency,
      paymentDataHashed: paymentDataToEncryptSHA256,
      paymentDataEncrypted: paymentDataEncrypted,
      paymentDataSignature: paymentDataSignature,
      symmetricKeyEncrypted: symmetricKeyEncrypted,
      symmetricKeySignature: symmetricKeySignature,
      maxMiningFeeRate: 2, // sats/vb
      releaseAddress: address,
      releaseAddressMessageSignature: releaseAddressSignature,
    }
  );
Now it’s the Seller’s turn to accept it.
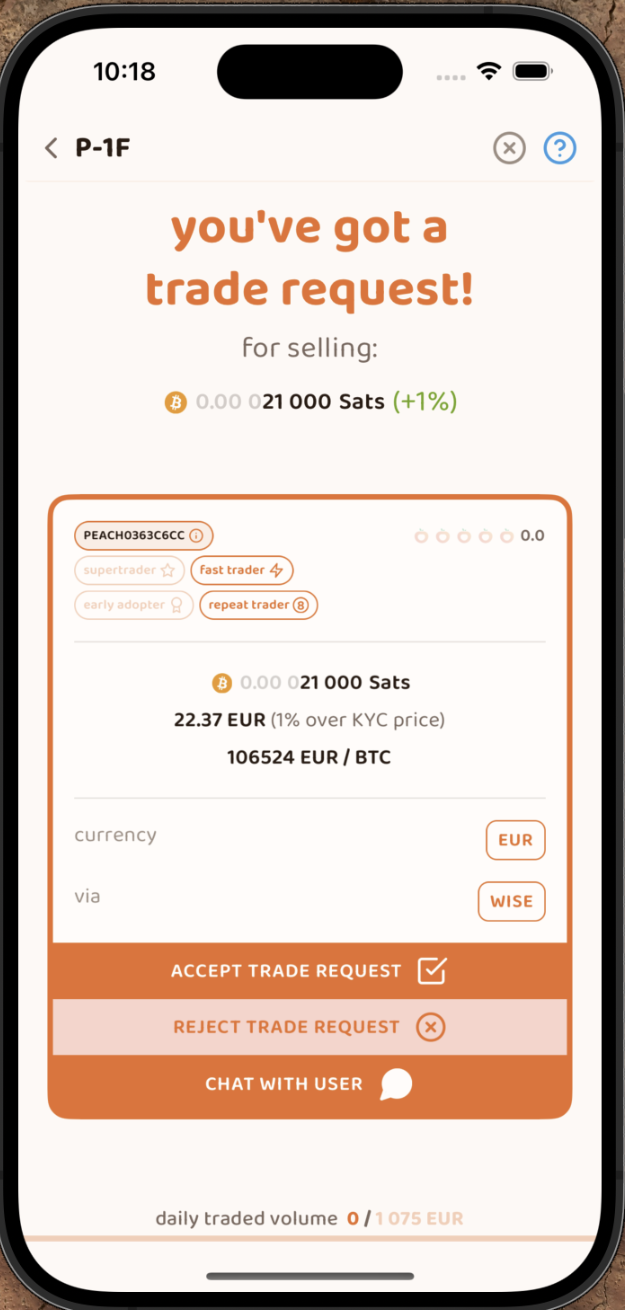
Step 5.S: Seller accepts the Trade Request:
The Seller has waited for a Buyer to interact with his Sell Offer. He checks the list of Trade Requests:
const receivedTradeRequestRequest = await session.get(
    "v069/sellOffer/" + sellOfferId + "/tradeRequestReceived"
  );

  const tradeReq = receivedTradeRequestRequest.data[0];
If the Seller wishes to accept the Trade Request, he must share his Payment Data with the Buyer, for the Buyer to know where the Fiat should be sent to.
Since a Symmetric Key was already created and submitted by the Buyer, the Seller can decrypt it (because it was encrypted with his own PGP Public Key) and use it to encrypt his own Payment Data.
  const receivedSymmetricKey = await decryptWithPrivateKey(
    tradeReq.symmetricKeyEncrypted,
    pgpPrivateKey
  );

  const sellOfferPaymentDataEncrypted = await encryptDataWithSymmetricKey(
    sellOfferPaymentDataToEncrypt,
    receivedSymmetricKey
  );

  const sellOfferPaymentDataSignature = await signPGPMessage(
    pgpPrivateKey,
    sellOfferPaymentDataToEncrypt
  );
And that is it! Now the Seller can accept the Trade Request and an official Trade begins!
  await session.post(
    "v069/sellOffer/" +
      sellOfferId +
      "/tradeRequestReceived/" +
      tradeReq.userId +
      "/accept",
    {
      paymentDataEncrypted: sellOfferPaymentDataEncrypted,
      paymentDataSignature: sellOfferPaymentDataSignature,
      paymentData: {
        [payment_data_method]: { hashes: [paymentDataEncryptSHA256] },
      },
    }
  );
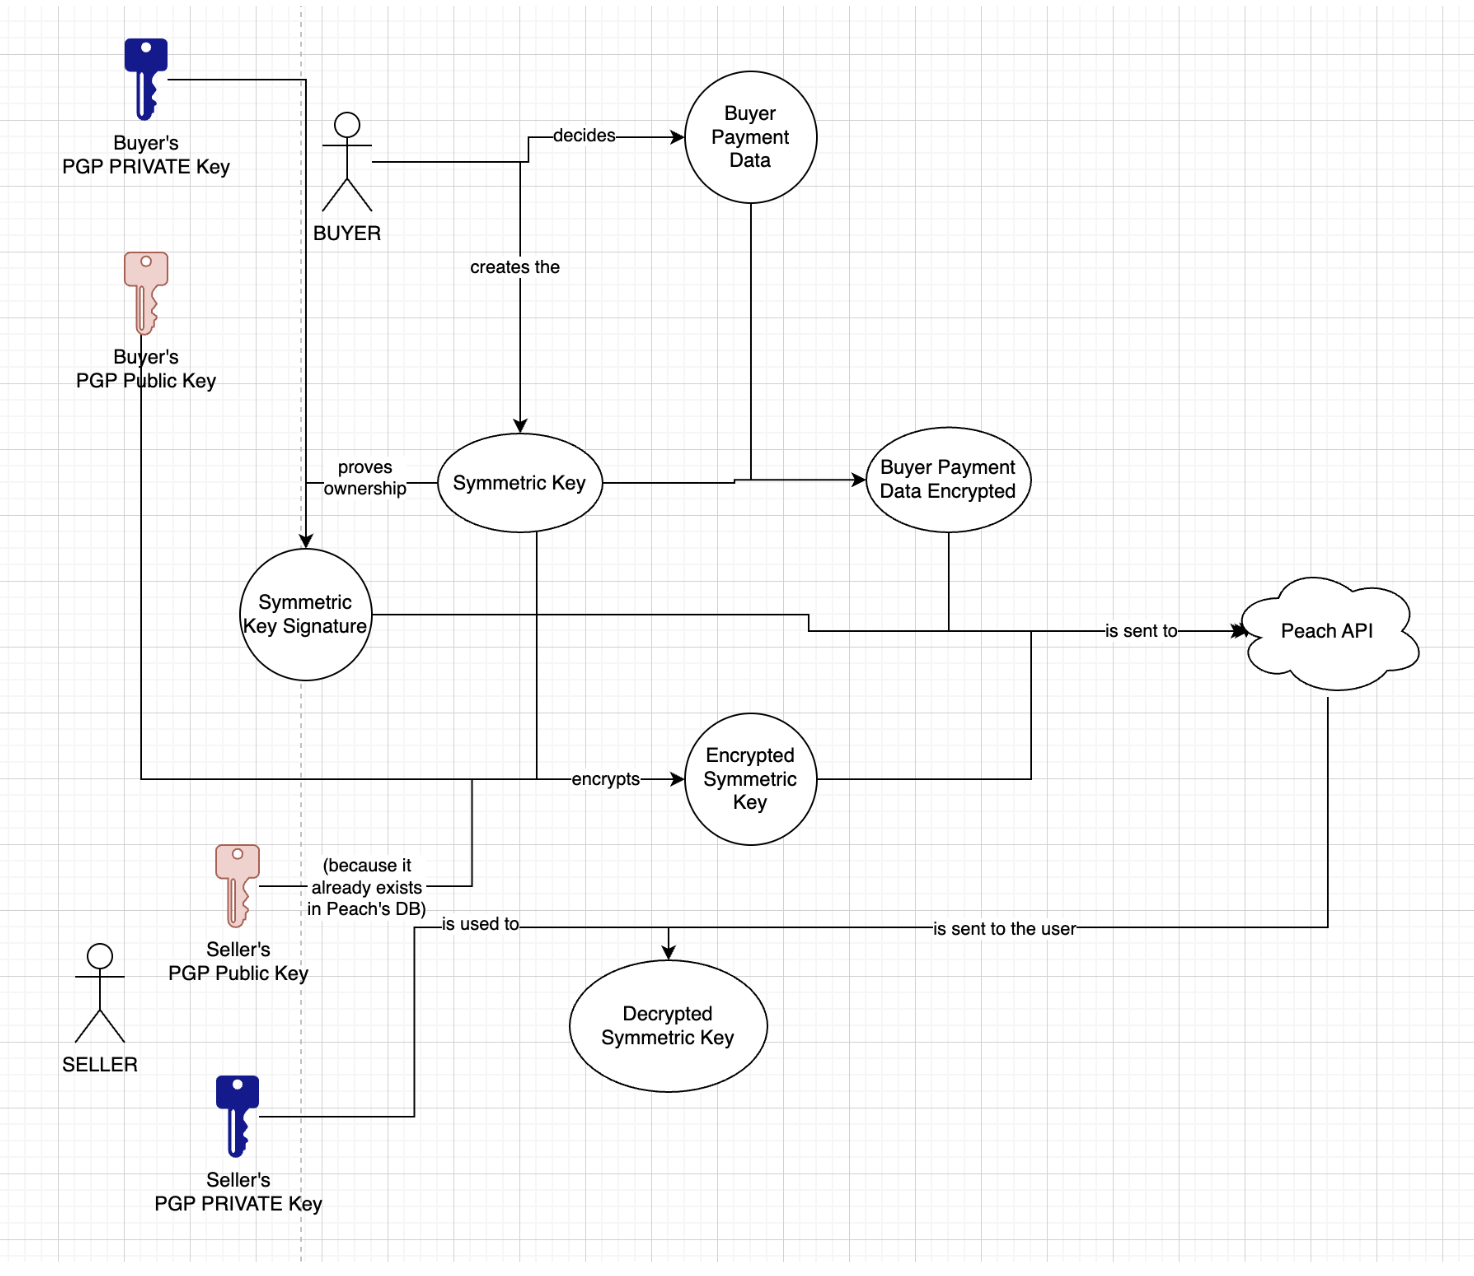
If understanding the entire process was hard, here is a picture to illustrate it:
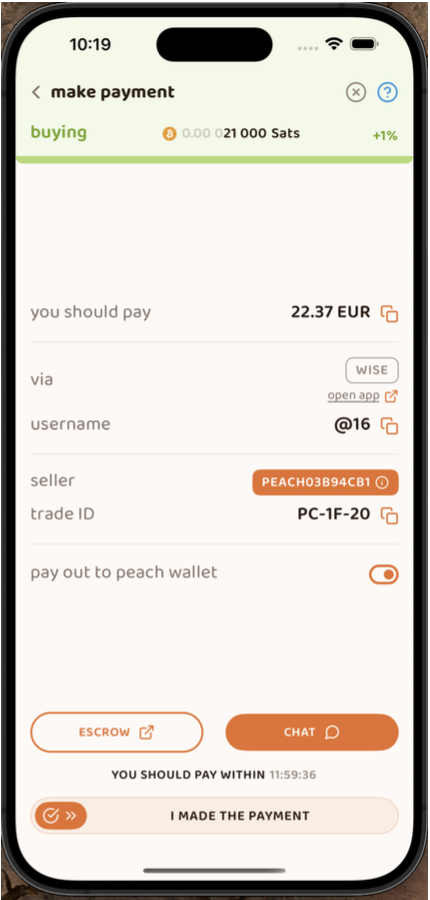
Step 6.B: Buyer declares the Payment as made
The Buyer can check if he has any Contracts (which are Trades agreed by both a Buyer and a Seller) by querying the Contract summaries endpoint:
  const contractsRes = await session.get("v1/contracts/summary");
  const contract = contractsRes.data.find((obj) =>
    obj.id.startsWith(sellOfferToTradeRequestId + "-")
  );

  if (contract.tradeStatus !== "paymentRequired") throw Error;
This will give him a list of all the Contracts that he participates in. If there is a Contract with the Trade Status “paymentRequired” then it is his turn to make the fiat payment.
For that to happen, he must decrypt the Seller’s Payment Data using the Symmetric Key from when the Trade Request was originally made. If he didn’t save it, it is fine, because it is available for him to be decrypted with his PGP Private Key.
  const contractRes = await session.get("v1/contract/" + contract.id);

  const receivedSymmetricKey = await decryptWithPrivateKey(
    contractRes.data.symmetricKeyEncrypted,
    pgpPrivateKey
  );

  if (receivedSymmetricKey !== symmetricKeyHex) throw Error;

  const decryptedSellerPaymentData = await decryptDataWithSymmetricKey(
    contractRes.data.paymentDataEncrypted,
    receivedSymmetricKey
  );

  console.log("Seller Payment Data ", JSON.parse(decryptedSellerPaymentData));
Now this is supposed to happen outside of Peach: the Buyer opens his Banking App (or similar) and performs a Fiat Transfer to the Seller’s Payment Data recipient.
If this step, as a reader, makes you unsure, remember the Bitcoin is already on the Escrow,controlled by Peach and the Seller. You can even access the Escrow address, which is available on the Contract data returned by the API, and use a Blockchain Explorer to check if the Bitcoin is there. After performing the Fiat transfer, the Buyer must declare that the Payment was made:
  const confirmPaymentRes = await session.post(
    "v1/contract/" + contract.id + "/payment/confirm"
  );
This was the Buyer’s last step. Now the Seller must confirm he received the Fiat, and release the Bitcoin in the Escrow to the Buyer’s address.
Step 6.S: Seller confirms he received the Payment
Similarly to the Buyer, the Seller checks the Contracts assigned to him.
  const contractsRes = await session.get("v1/contracts/summary");
  const contract = contractsRes.data[0];

  const contractRes = await session.get("v1/contract/" + contract.id);
On the Contract’s API response, the Seller will get a Partially Signed Bitcoin Transaction (PSBT) which is a transaction of the Bitcoin in the Escrow to the Buyer’s address, with a signature of Peach. This means that it only needs the signature of the Seller to become a valid transaction:
  const releasePSBTBase64 = contractRes.data.releasePsbt;

  const parsedPSBT = bitcoin.Psbt.fromBase64(releasePSBTBase64, {
    network: bitcoin,
  });

  parsedPSBT.signInput(0, childSell);
Now the Seller can finalize the Transaction, by passing the 2 signatures and the Escrow Bitcoin Script. Since we are going through the MultiSig path of the script (written as the 2nd path, we need to pass OP_FALSE to the stack, to influence the IF statement correctly)
export const getFinalScript = (_inputIndex, input, bitcoinScript) => {
  const network = bitcoin;

  const payment = payments.p2wsh({
    network,
    redeem: {
      network,
      output: bitcoinScript,
      input: bitcoin.script.compile([
        input.partialSig[0].signature,
        input.partialSig[1].signature,
        opcodes.OP_FALSE,
      ]),
    },
  });

  parsedPSBT.finalizeInput(0, getFinalScript);

  const tx = parsedPSBT.extractTransaction().toHex();
The last step: submit the finalized Transaction to Peach’s API:
  await session.post("v1/contract/" + contract.id + "/payment/confirm", {
    releaseTransaction: tx,
  });
Ladies and Gentleman, this is how we trade at Peach with maximum security and privacy!
October 23rd, 2025